Your information saved successfully.
Waitlist Overview
The simplest and most effective way to manage a waitlist
Get started in minutes. Watch our overview video to see how it works:
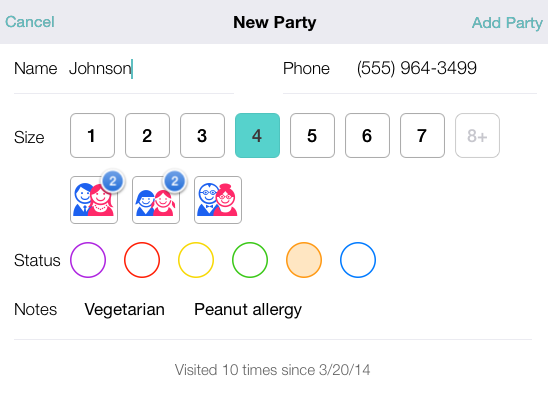
Add – Entering customer information is simple and flexible. Below is the default screen of key information, and there are several options to customize this to your business needs.

Estimate – Choose an estimated wait time or ETA depending on whether you are adding a person to the waitlist or scheduling a reservation or appointment time.
Confirm – Upon being entered in Waitlist Me, customers will receive a confirmation text with their estimated wait and a link to the public view of the waitlist where they can check their place in line from their phone browser (they don’t need to download an app). Or for ETAs, an email confirmation is available.
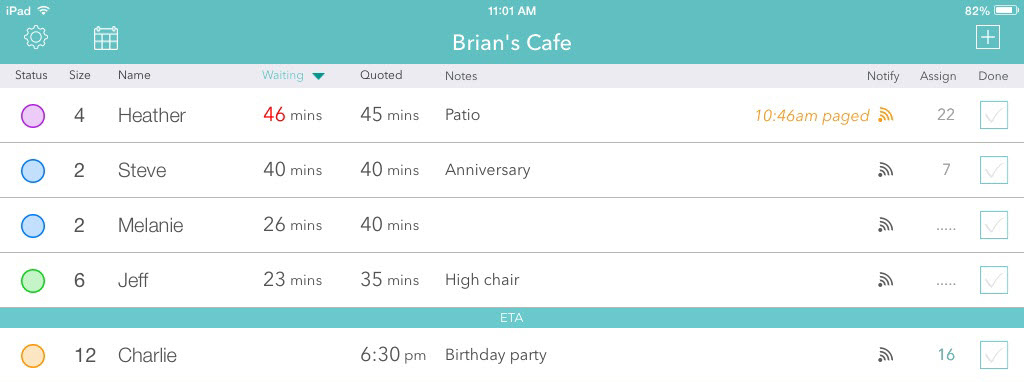
View – Your main waitlist view makes it easy to see how long people have been waiting as well as any notes or colors you have added. Seeing actual waits next to estimates will help improve your quote accuracy and reduce walkaways. Notes and status colors help you stay organized, and your main actions of notifying and servings customers are at your fingertips. You can also see wait estimates and stats at the bottom, and customize the waitlist view to your preferences.

Notify – When you are ready for your customer, simply tap the notification button to send them a text. They have the option to send a simple reply on whether they are on their way or cancelling, and if you don’t hear from them you can send them a second text message or call notification. Here is more on notifications and how you can customize them.
Serve – When the customer arrives you can tap to check them off your list, and you can also assign them to a table or other resource depending on your business. Our Pro & Platinum services have even more features for assigning customers and managing their whole visit more smoothly.
More – The basic waitlist features are simple and easy to get started with about 10-20 minutes of setup. Additional features may take up to a couple hours to set up, and include scheduling future reservations using our reservation calendar view, allowing customers to join the list or schedule themselves remotely, and accessing a full spatial floorplan layout.
Add – Entering customer information is simple and flexible. Below is the default screen of key information, and there are several options to customize this to your business needs.

Estimate – Choose an estimated wait time or ETA depending on whether you are adding a person to the waitlist or scheduling a reservation or appointment time.
Confirm – Upon being entered in Waitlist Me, customers will receive a confirmation text with their estimated wait and a link to the public view of the waitlist where they can check their place in line from their phone browser (they don’t need to download an app). Or for ETAs, an email confirmation is available.
View – Your main waitlist view makes it easy to see how long people have been waiting as well as any notes or colors you have added. Seeing actual waits next to estimates will help improve your quote accuracy and reduce walkaways. Notes and status colors help you stay organized, and your main actions of notifying and servings customers are at your fingertips. You can also see wait estimates and stats at the bottom, and customize the waitlist view to your preferences.

Notify – When you are ready for your customer, simply tap the notification button to send them a text. They have the option to send a simple reply on whether they are on their way or cancelling, and if you don’t hear from them you can send them a second text message or call notification. Here is more on notifications and how you can customize them.
Serve – When the customer arrives you can tap to check them off your list, and you can also assign them to a table or other resource depending on your business. Our Pro & Platinum services have even more features for assigning customers and managing their whole visit more smoothly.
More – The basic waitlist features are simple and easy to get started with about 10-20 minutes of setup. Additional features may take up to a couple hours to set up, and include scheduling future reservations using our reservation calendar view, allowing customers to join the list or schedule themselves remotely, and accessing a full spatial floorplan layout.
