Su información se guardó exitosamente.
Server Assignments
Helping everyone get their fair share of the work
Waitlist Me makes it simple to track table availability and server assignments. There are a couple options that can be customized to your business needs and workflows.
If you manage your tables by section, the first thing you’d want to do is visit this page to learn more about setting up your sections and layouts. If your business isn’t a restaurant, you can also use these same features to group your staff, rooms, or other resources visually in the Grid view.
Our Pro level service provides a very simple way to know what server is assigned to what section by using the Assignment Notes feature. Simply tap on the “Notes” link to view a list of sections and text form fields where you can enter server names or other notes for each section. It is easy to make changes all at once for all of the servers and sections.

With our Platinum level service, you can also set up an additional floorplan view, and be able to position these same notes where you’d like in the floorplan view.
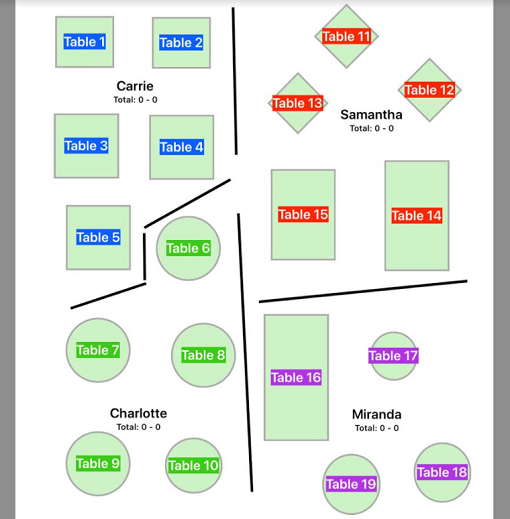
Also with Platinum you also have the option to assign servers individually to tables and track the activity by server rather than section. This is especially useful if you don’t use sections and use a system of assigning tables based on server turns or server activity. Or if you have servers assigned to sections, but need to have some floaters to help out where needed or other cross section activity, you can combine the section notes with individual server assignments to keep track of everything.
To set up individual servers, tap on the gear icon in the Waitlist Me app to go to the Settings and then go to Manage Assignments > Servers. Here you can enter the names of your servers. Select Status on the upper right of this menu if you want to add colors for the servers. Using different colors can make it easier to see where your different servers are assigned. Or maybe you want all your patio servers coded as green to make it easier to distinguish them from the indoor servers.
After a table has been seated, select the table to access the footer bar. Here you will see a Server button, which brings up a menu of active servers. Choose a name to assign that server. You can sort by alphabetical order, the number of tables or seats each has had, or the amount of time since the last table was sat for each employee.
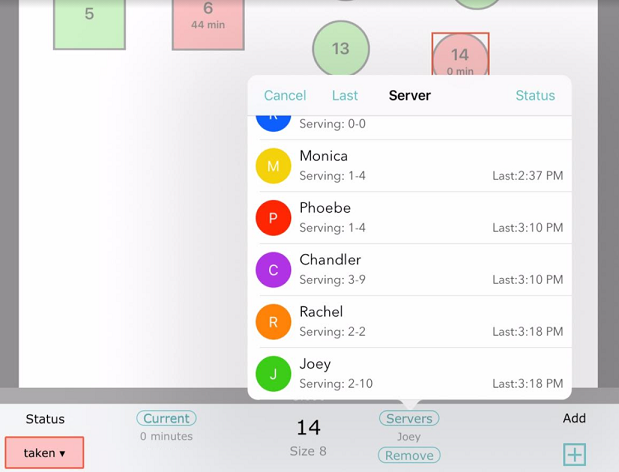
Also, in the upper right of this server window is a Status option. The Server Status area lets you mark the servers who aren’t working today as inactive, and to change status colors if needed.
If you haven’t yet named your tables, you can do that in the settings under Assignments. For the Pro features, you can find helpful information on navigating the grid view here. For the Platinum features, the video on this page will show you how to place your tables in your floorplan.
If you manage your tables by section, the first thing you’d want to do is visit this page to learn more about setting up your sections and layouts. If your business isn’t a restaurant, you can also use these same features to group your staff, rooms, or other resources visually in the Grid view.
Our Pro level service provides a very simple way to know what server is assigned to what section by using the Assignment Notes feature. Simply tap on the “Notes” link to view a list of sections and text form fields where you can enter server names or other notes for each section. It is easy to make changes all at once for all of the servers and sections.
With our Platinum level service, you can also set up an additional floorplan view, and be able to position these same notes where you’d like in the floorplan view.
Also with Platinum you also have the option to assign servers individually to tables and track the activity by server rather than section. This is especially useful if you don’t use sections and use a system of assigning tables based on server turns or server activity. Or if you have servers assigned to sections, but need to have some floaters to help out where needed or other cross section activity, you can combine the section notes with individual server assignments to keep track of everything.
To set up individual servers, tap on the gear icon in the Waitlist Me app to go to the Settings and then go to Manage Assignments > Servers. Here you can enter the names of your servers. Select Status on the upper right of this menu if you want to add colors for the servers. Using different colors can make it easier to see where your different servers are assigned. Or maybe you want all your patio servers coded as green to make it easier to distinguish them from the indoor servers.
After a table has been seated, select the table to access the footer bar. Here you will see a Server button, which brings up a menu of active servers. Choose a name to assign that server. You can sort by alphabetical order, the number of tables or seats each has had, or the amount of time since the last table was sat for each employee.
Also, in the upper right of this server window is a Status option. The Server Status area lets you mark the servers who aren’t working today as inactive, and to change status colors if needed.
If you haven’t yet named your tables, you can do that in the settings under Assignments. For the Pro features, you can find helpful information on navigating the grid view here. For the Platinum features, the video on this page will show you how to place your tables in your floorplan.